
Tokyo Disney Resort Part I: The general stuff
Getting there, getting tickets, getting on rides, and much more. Stuff to know that applies to either park.


Let’s make one thing clear: There are undoubtedly several of you out there that have spent plenty more time than I have at Tokyo Disney Resort (TDR). In fact, probably a few folks who went to Japan solely to visit TDR and probably spent several days or longer there.
That ain’t me. As much as I love Disney parks, hitting up TDR was always secondary to an overall trip to the Land of the Rising Sun. So my experience is based on that — a trip where we spent lots of time doing other things, and while TDR was a central piece that we planned for and massively enjoyed, my time at the resort was limited to two days, one for each theme park.
But, it’s firsthand experience, and I think I can share a few things that aren’t on the typical “how to plan your trip to Tokyo Disney” content that’s already out there. If you have stuff to add, please, by all means drop a comment or a reply.
With that said, I’m starting with some general stuff that’s good to know. I’ll follow that up with individual posts covering Tokyo Disneyland and DisneySea in further detail.
Without further ado, here are some important things to know for your visit to Tokyo Disney Resort.
Getting there

If it’s your first time visiting the Tokyo area and somehow you haven’t heard this yet — and even if you have heard it, it bears repeating — Tokyo’s public train system is convoluted and confusing. That’s true for a lot of places, but unlike in New York City where management of the train system has at least been centralized, there are still multiple lines running out of most stations that are owned and operated by separate companies.
And several stations are essentially miniature cities, seemingly constantly under construction, and you can’t really count on signs being in English. Several times on our recent trip, we’d feel pretty good that we had found the right path to find the right platform and knew where to go, and then suddenly there just wouldn’t be any more signage pointing you in the right direction. Yes, you can and should use Google Maps to navigate, but when you’re underground it can get pretty spotty.
In other words, if you don’t get lost inside a station or take a train to the wrong place at least once while visiting Tokyo, then you’re probably not using the trains.
That said, it’s a perfectly reasonable, and by far the cheapest, way to get to TDR. When taking trains, Maihama Station is your destination.
Unfortunately, even using Google Maps and researching all of this ahead of time, we somehow ended up on the wrong train — an express instead of a local (I think?), and got to the park an hour later than we planned. That sucked. Don’t do that. I’m not sure how to exactly tell you what not to do, because again, that’s travel for ya, but just don’t do what I did.
The good news is, once you’ve arrived at Maihama, you can literally walk to Tokyo Disneyland. There are even storage lockers at the park entrance which run ¥800 (a little over $5) for the day to store most, if not all, of your luggage if needed.
There’s also a bus, called the limousine bus, that you can take directly from the airport to a TDR hotel. It runs ¥1,000 for adults and ¥500 for kiddos, which is a solid deal compared to the cost of taking a train into the city, but you have to be heading directly to/from a TDR hotel and to/from one of the main airports (Haneda or Narita).
There are some other bus options as well, such as catching a TDR line from Shinjuku Station — it might take longer, but you won’t run the risk of getting on the wrong train. Spend some time well ahead of your trip Google mapping it to see what your options are. A word of warning: Google Maps told me to stay on the train I was on and that it would simply switch lines. That turned out to be wrong and that’s what set us back on time. So, watch out for that, I guess.
Also, taxis were out of the question for us — the cost would have been far too prohibitive, but maybe if you’re a Richie Rich you can choose that route instead. You’re likely looking at ~$100 or more for a car ride depending on where you’re coming from.
And one more quick note: Even once you get to Maihama Station, you’ll still need to transfer to the Disney Resort Line monorail if you’re going anywhere besides Disneyland. It’s super easy to navigate, but it’s an extra step. A little more on that below.
Get an IC card

If for some reason you didn’t just get one at the airport, make sure you get an IC card before you hit up the resort. Even if you’re using a bus to get to TDR, even if you’re renting a car and driving (why would you do that though?), you should get one.
Why? Not because we like you, but because in Japan there are lots of laws, one of them being around mass transportation that makes it so you have to pay to ride the Disney Resort Line monorail. Don’t get stuck at the ticket machines before or after your day at the parks; instead, grab an IC card, load it appropriately (I’d recommend ¥2,000 to start), and then all you have to do is tap at the gates to get in and out of the monorail stations.
You’ve probably read about these, but Pasmo and Suica tend to be the most common in the Tokyo area. We ended up with an ICOCA card because we came into Osaka, and it worked just fine throughout our trip. It really doesn’t matter which one you get, just get one — and remember that everyone in your party who’s older than 6 needs their own card.
Get an eSim for your phone
Just do it. It’s less that $20 for a reliable one. In my case, I actually purchased a 10-day international plan from my carrier for about $20, so I could still call or text, AND an eSim. This proved crucial — in some regions, my carrier’s data service worked great, but at TDR I needed to switch to the eSim in order to have a solid data connection.
And without that connection, you are likely screwed. No mobile orders, no scanning pictures into your app, no paying to skip lines — you don’t want any of that.
I bought one via Ubigi and set things up a day or two before we left for our trip. I went with the 10GB, 30-day plan, and that was plenty good for me. It worked well and I’d certainly recommend it, but I think there are plenty that will be just as serviceable.
It’s also worth looking through your phone’s settings ahead of time to make sure you can switch things around easily. I have an iPhone 16, and all I had to do was go to my settings —> Cellular —> change data sim as needed. It’s not hard, but when you’re in a foreign country trying to figure things out it’s nice to have at least one thing already buttoned up.
The Tokyo Disney Resort app — and fixing that annoying error
One thing that’s fun is when everything has been working great in your app, and then you go to buy a Disney Premier Access pass (DPA) and you start getting errors. It definitely doesn’t disrupt your whole day and cause you to waste an hour changing credit card numbers and talking to cast members while trying to just get your damn reservation for the damn ride you want.
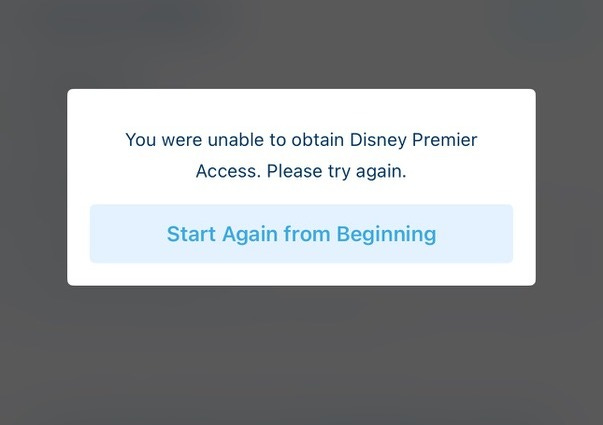
So, here is a crucial tip if you get the error above, OR the oft-referred to error about your credit card not working: simply restart your phone.
Yup, that’s all it finally took for me. I kept changing my credit card because I kept being told that was the problem, until it finally told me I couldn’t change my card anymore. Then I walked to an information booth — which in DisneySea’s case there is basically only one of at the very end of the park, unlike the American parks where you just find the blue umbrellas — and was told I should find some random shop in some other part of the park that was about 80 miles away and physically purchase a DPA.
Thankfully, the voice of reason, aka my wife, told to me to restart my phone, and voila: DPA secured and all app issues ironed out from there.
You’ll also have to enter your credit card information into the app the first time you purchase a DPA or put in a mobile order, which can be nerve wracking if you’re trying to secure a highly coveted spot for something like Enchanted Tale of Beauty and the Beast or Anna and Elsa’s Frozen Journey.
All that said, overall the app experience will be very familiar to anyone who’s visited the American parks. Some words and navigation are different here and there, and it does some wonky stuff (like rotate the map depending upon which park map you’re looking at… why?) but overall as long as you have a good data connection and think to restart your phone if there are any issues, you’ll be set.
You can find links to download the app to your phone here.
Hotels and stuff
We ended up staying at the Tokyo Bay Hilton, and it was honestly great. It was roughly a five-minute walk to the monorail station, there’s a Lawson convenience store downstairs, and these are probably the most spacious rooms you’ll find anywhere during your stay in Tokyo.
But, while it’s great, it comes with none of the on-property perks that the official TDR hotels do. The biggest perk of which is Happy Entry. Happy Entry is sort of like Early Theme Park Entry in the USA (where it still exists, that is), but you can only get in about 15 minutes early. That said, those 15 minutes can make all the difference. We arrived at DisneySea an hour early and it was kind of brutal wading through the sea of lines. Security is very thorough, but not really as efficient as the American parks.
So if you’re really aiming for a certain DPA or hoping to get in a standby line nice and early, Happy Entry is a huge help. But here’s the thing: It’s only available for certain parks at certain hotels. Mira Costa gets you in early at DisneySea, but not at Disneyland. Same deal but reversed at the Tokyo Disneyland Hotel. And as you may have guessed, the on-property hotels are much more expensive. That also means if you want Happy Entry at both parks, you’ll need to be able to book (at least) two different hotels and switch and some point during your stay.
I will say that the Tokyo Disneyland Hotel looks way cooler than Anaheim’s version, but beyond that I can’t give any advice for those. Happy Entry would have been awesome if we could have swung it budget wise, but so it goes.
We did also spend some time looking at Vacation Packages. VPs essentially bundle your park tickets, DPAs, and hotel together — but again, the cost is WAY higher than just getting tickets yourself and staying off property. We ultimately decided we couldn’t justify spending an extra $1,000 essentially to get on one or two extra attractions. More on that in the later posts.
Attraction photos
This might seem like a small thing, but take note: attraction photos are only available on the day you’re visiting the park. I falsely assumed you could just take a picture of the monitor and put the code into the app later on, just like I’ve done hundreds of times.
Wrong! At TDR, you instead open the app, scroll down to Photo Key, and then click Scan Photo Key. You’ll just hold your phone up to the monitor and scan the QR code that’s on your photo, and boom, image saved to your account and you can decide to buy it or whatever. If you don’t do that, you’re basically hosed, so be ready.
Getting tickets and skipping lines

Ahead of time I read about folks having issues being able to buy tickets, and even some horror stories about dates selling out way in advance.
Turns out, the horror stories were largely unwarranted, at least for me. While the parks have indeed been very busy, no single date has sold out since I started paying attention about six months ago. You can go ahead and buy your tickets as far out as two months in advance, but you can wait a sec if you’re still finalizing things.
And if you need to change your date for any reason, you essentially have a year from your original purchase date to play with.
One big difference at TDR compared to the American parks is that there is no concept of multi-day tickets. You buy one ticket for one park for one day and that’s it. Going for three days? That’s three separate tickets, three separate transactions.
I had no issues simply buying my park tickets directly in the app using my credit card.
The idea of a Park Hopper ticket is also more or less a nonstarter. And frankly, I doubt you’d have the legs to hop at these parks anyways, but there is a limited time Park Hopper ticket being offered for early 2026. Learn more about it here. Maybe it’s a sort of test run?
Another difference? The price! While TDR uses a tiered-range, just like the American parks, even on the highest end you’re looking at approximately $70 USD for a single-day ticket. Not too shabby, and it makes paying for extra stuff a little more tolerable.
Speaking of which, skipping lines at TDR, while possible, is a bit different. Here’s a quick overview:
Disney Premier Access: You pick a time and pay to skip lines. It’s basically Individual Lightning Lane. These are mostly available for the most-coveted attractions and certain ones are harder to get than others. More to come on that in the next posts. You have a two-hour cooldown period in between purchases, but you can buy passes for the same ride more than once.
40th Anniversary Priority Pass: This is essentially a free Lightning Lane. You can book one per hour, but chances are you’ll be able to book one and by the time your window is open again they’ll all be gone for the day.
Standby Pass: If you’re researching a trip to Tokyo Disney, you may have come across mention of something called a Standby Pass. This is equivalent to a virtual queue, and currently none of the attractions at TDR offer it, so just pretend this never came up.
Unlimited Vacation Package: If you’re ready to sling some dough around, you can of course opt for pre-booking some passes via a vacation package, and there’s even such a thing as an unlimited vacation package. Sadly, I never even thought about being able to afford such a thing, so you’re on your own here.
I will say it is well worth skipping as many lines as you can, as the waits tend to balloon way past what we’re used to in the U.S. Rise of the Resistance will look like a cakewalk by the time you’re done here.
******
That covers most of the general stuff, but if you have any questions, please drop them my way and I’ll do my best to answer them.
Also, I’ll get back to the news updates soon, but I wanted to get these thoughts down while they’re still fresh. Parts II and III on Tokyo Disneyland and DisneySea coming soon!
Finally got to it, and I am so thankful you are taking the time to cover these basics! Getting there, the entrance, restarting the phone (!!), premier pass, etc. Thank you for putting it all together. Can't wait for part two. I'd also love some pictures of attractions you can find only at the parks in Japan.
Can’t wait to give this one a read! ✨